 | |
| Deter - The Fully Determined Cube | |
funCUBING Index Page · funCUBING Projects
I have always been fascinated by different ways of determining the placement and orientation of the cubies on a cube. There are many sticker modifications where a cube becomes under-determined. This means that some cubies can be swapped, flipped or rotated without noticing the effect. There are only very few concepts, where a cube is fully determined, but not heavily over-determined.
One example is the Rubik's Domino, where placement and orientation of one layer is determined by Domino Dots on a single face. However, the Rubik's Domino has lead to many discussions what would be the correct solved state.
Another example is the Tartan Cube, where the six faces are marked by the permutation of four colors. In addition to that, the color pattern also determines the placement of the cubies within their layer.
I wanted to create a cube that is fully determined, without room for discussion, while at the same time having a simple and minimized set of "markers".
 | |
| Deter - The Fully Determined Cube | |
Let me introduce you " Deter " the Fully Determined Cube.
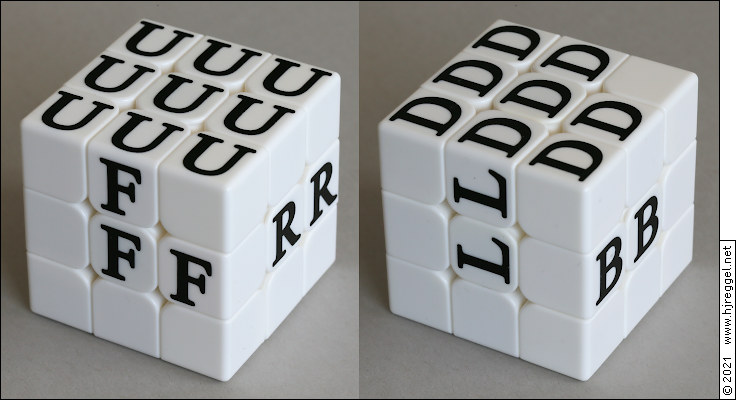
Deter has six sets of different markers. The markers are of the same color, but differ in shape. Each of the six shapes has visible orientation. It should be obvious that each face should only show one type of shape in the same orientation.
Each of the centers is marked, therefore, the orientation of all centers is determined.
But that's not enough, the shapes read U, F, R, B, L, D. That means that even the proper orientation of the cube itself is determined.
Deter has six easy to distinguish shapes, no need to recorgnize colors. But only 26 markers are used on the 54 cubie faces, that's only 48.15% marked cubie faces.
The Rubik's Domino had two serious drawbacks: The correct order of the sequence was not clear, and the correct rotation of the layers against each other was not indicated clearly.
In the Brainstorming section of my 3×3×3 Domino Cube Project , I described a way of marking the cubies around. This was used as the basic principle, here.
Let's start with the "U" face. All nine cubie faces are marked, giving the placement and orientation for the whole upper layer, including the orientation of the centers. Unlike the sequence of Domino Dots, the shape leaves no room for discussion which cubie goes where.
As a "seed" where and how to continue, one edge cubie of the upper layer carries an "F" mark. This indicates where the front face must go, while at the same time giving the proper orientation of the shape. All edge cubies of the down layer are marked, so only four edge pieces are left to be distributed on the middle layer. There is only one edge piece marked "F", and because of the orientation of the shape, it can only go in one of the two possible spots.
We continue on the "R" face, where the "F" edge piece already occupies one of the two edge piece slots. Therefore, the one edge piece marked "R" must go the other spot. At the same time, the shape on the edge piece determines the rotation of the "R" center. The same procedure continues on the "B" face.
The last face around is the "L" face. But there is only one blank edge piece left, which must go into the last free middle layer edge piece slot. The orientation of this blank piece will be forced later, when orienting the edge pieces of the "D" layer. But there is one edge piece of the "D" layer, which carries an "L" mark. This edge piece determines the rotation of the down layer against the middle layer, while at the same time setting the orientation of the "L" center piece.
The last layer, the "D" face, is similar to the "U" face. Placement and orientation are given by the orientation of the shape, except for one blank corner piece. But because seven of the eight corner pieces have a determined placement, the eighth corner piece can only go to the eighth spot. The same applies to the orientation of the blank corner piece. Because all other seven corner pieces have a determined orientation, the eight corner piece gets a forced orientation.
And when you are done solving the cube, you are supposed to place it "U" side up, "F" face to the front. Did you know that there are 24 orientationd for a cube, if only 90° rotations are allowed?
funCUBING Index Page · funCUBING Projects · Top of Page